How to control LEGO® Power Functions trains with Raspberry Pi
Blast from the Past
The best present my parents ever gave me for Sinterklaas probably was a LEGO® train. I can’t count the hours I’ve played with the 9V train set they gave me back then. :-)

More than 25 years have passed since then, but I have to admit that I’m still quite fascinated by LEGO® trains today! This fascination drove me to see if I could use everyday technology (Java, Python, JavaScript) to control them.
The result is a project that I call the LEGO® IR Blaster: a Python/Flask application for Raspberry Pi that gives you a web interface to control LEGO® Power Functions (trains). The web interface gives you the same control possibilities as the LEGO® Power Functions IR Speed Remote Control 8879.
You can find this open source project on GitHub.
In this article I will explain how to build the IR blaster hardware and deploy the Flask application to Apache on Raspberry Pi.
Video
This YouTube video demonstrates the LEGO® IR Blaster in action.
IR blaster hardware
To build an IR blaster, you need the following components, besides the Raspberry Pi:
- wires;
- breadboard;
- IR led;
- BC547B transistor;
- 10 kΩ resistor;
- 100 Ω resistor;
- multimeter for testing and measurements.
I’m using a Raspberry Pi 2 Model B myself, but other models might also work for this project.
Below is the hardware schema you need to build. Forgive me for the sketch. ;-)
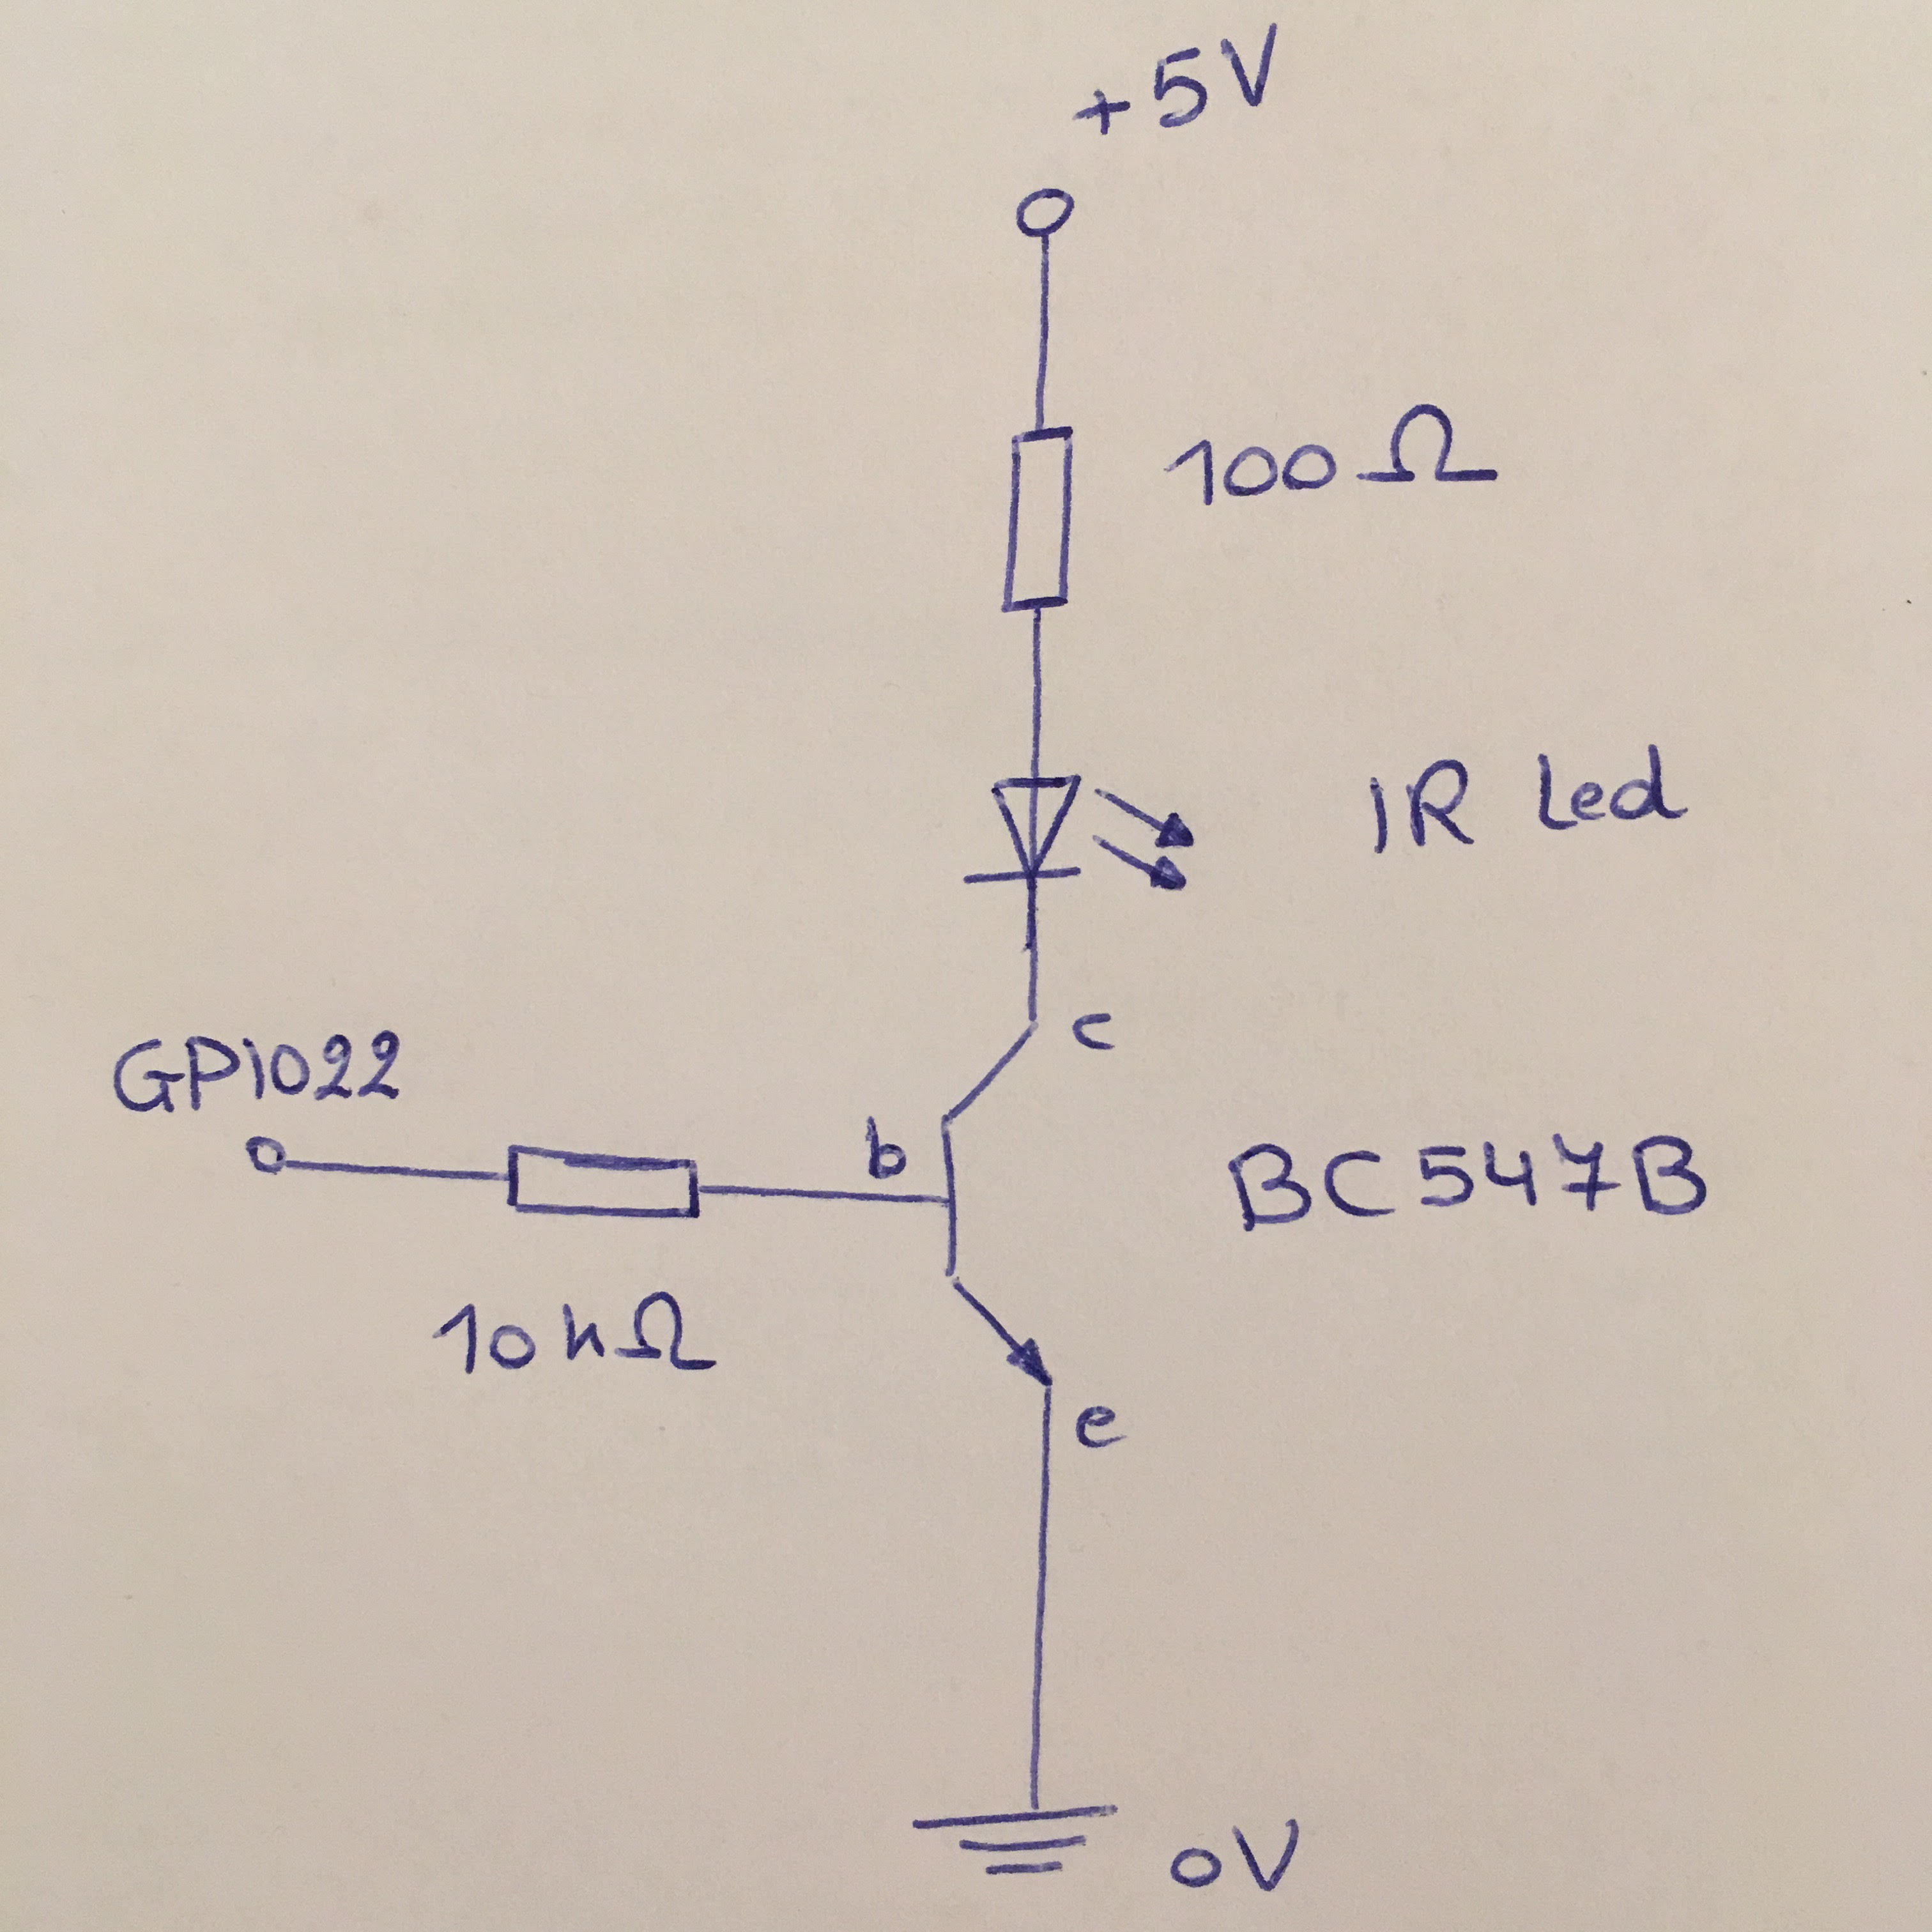
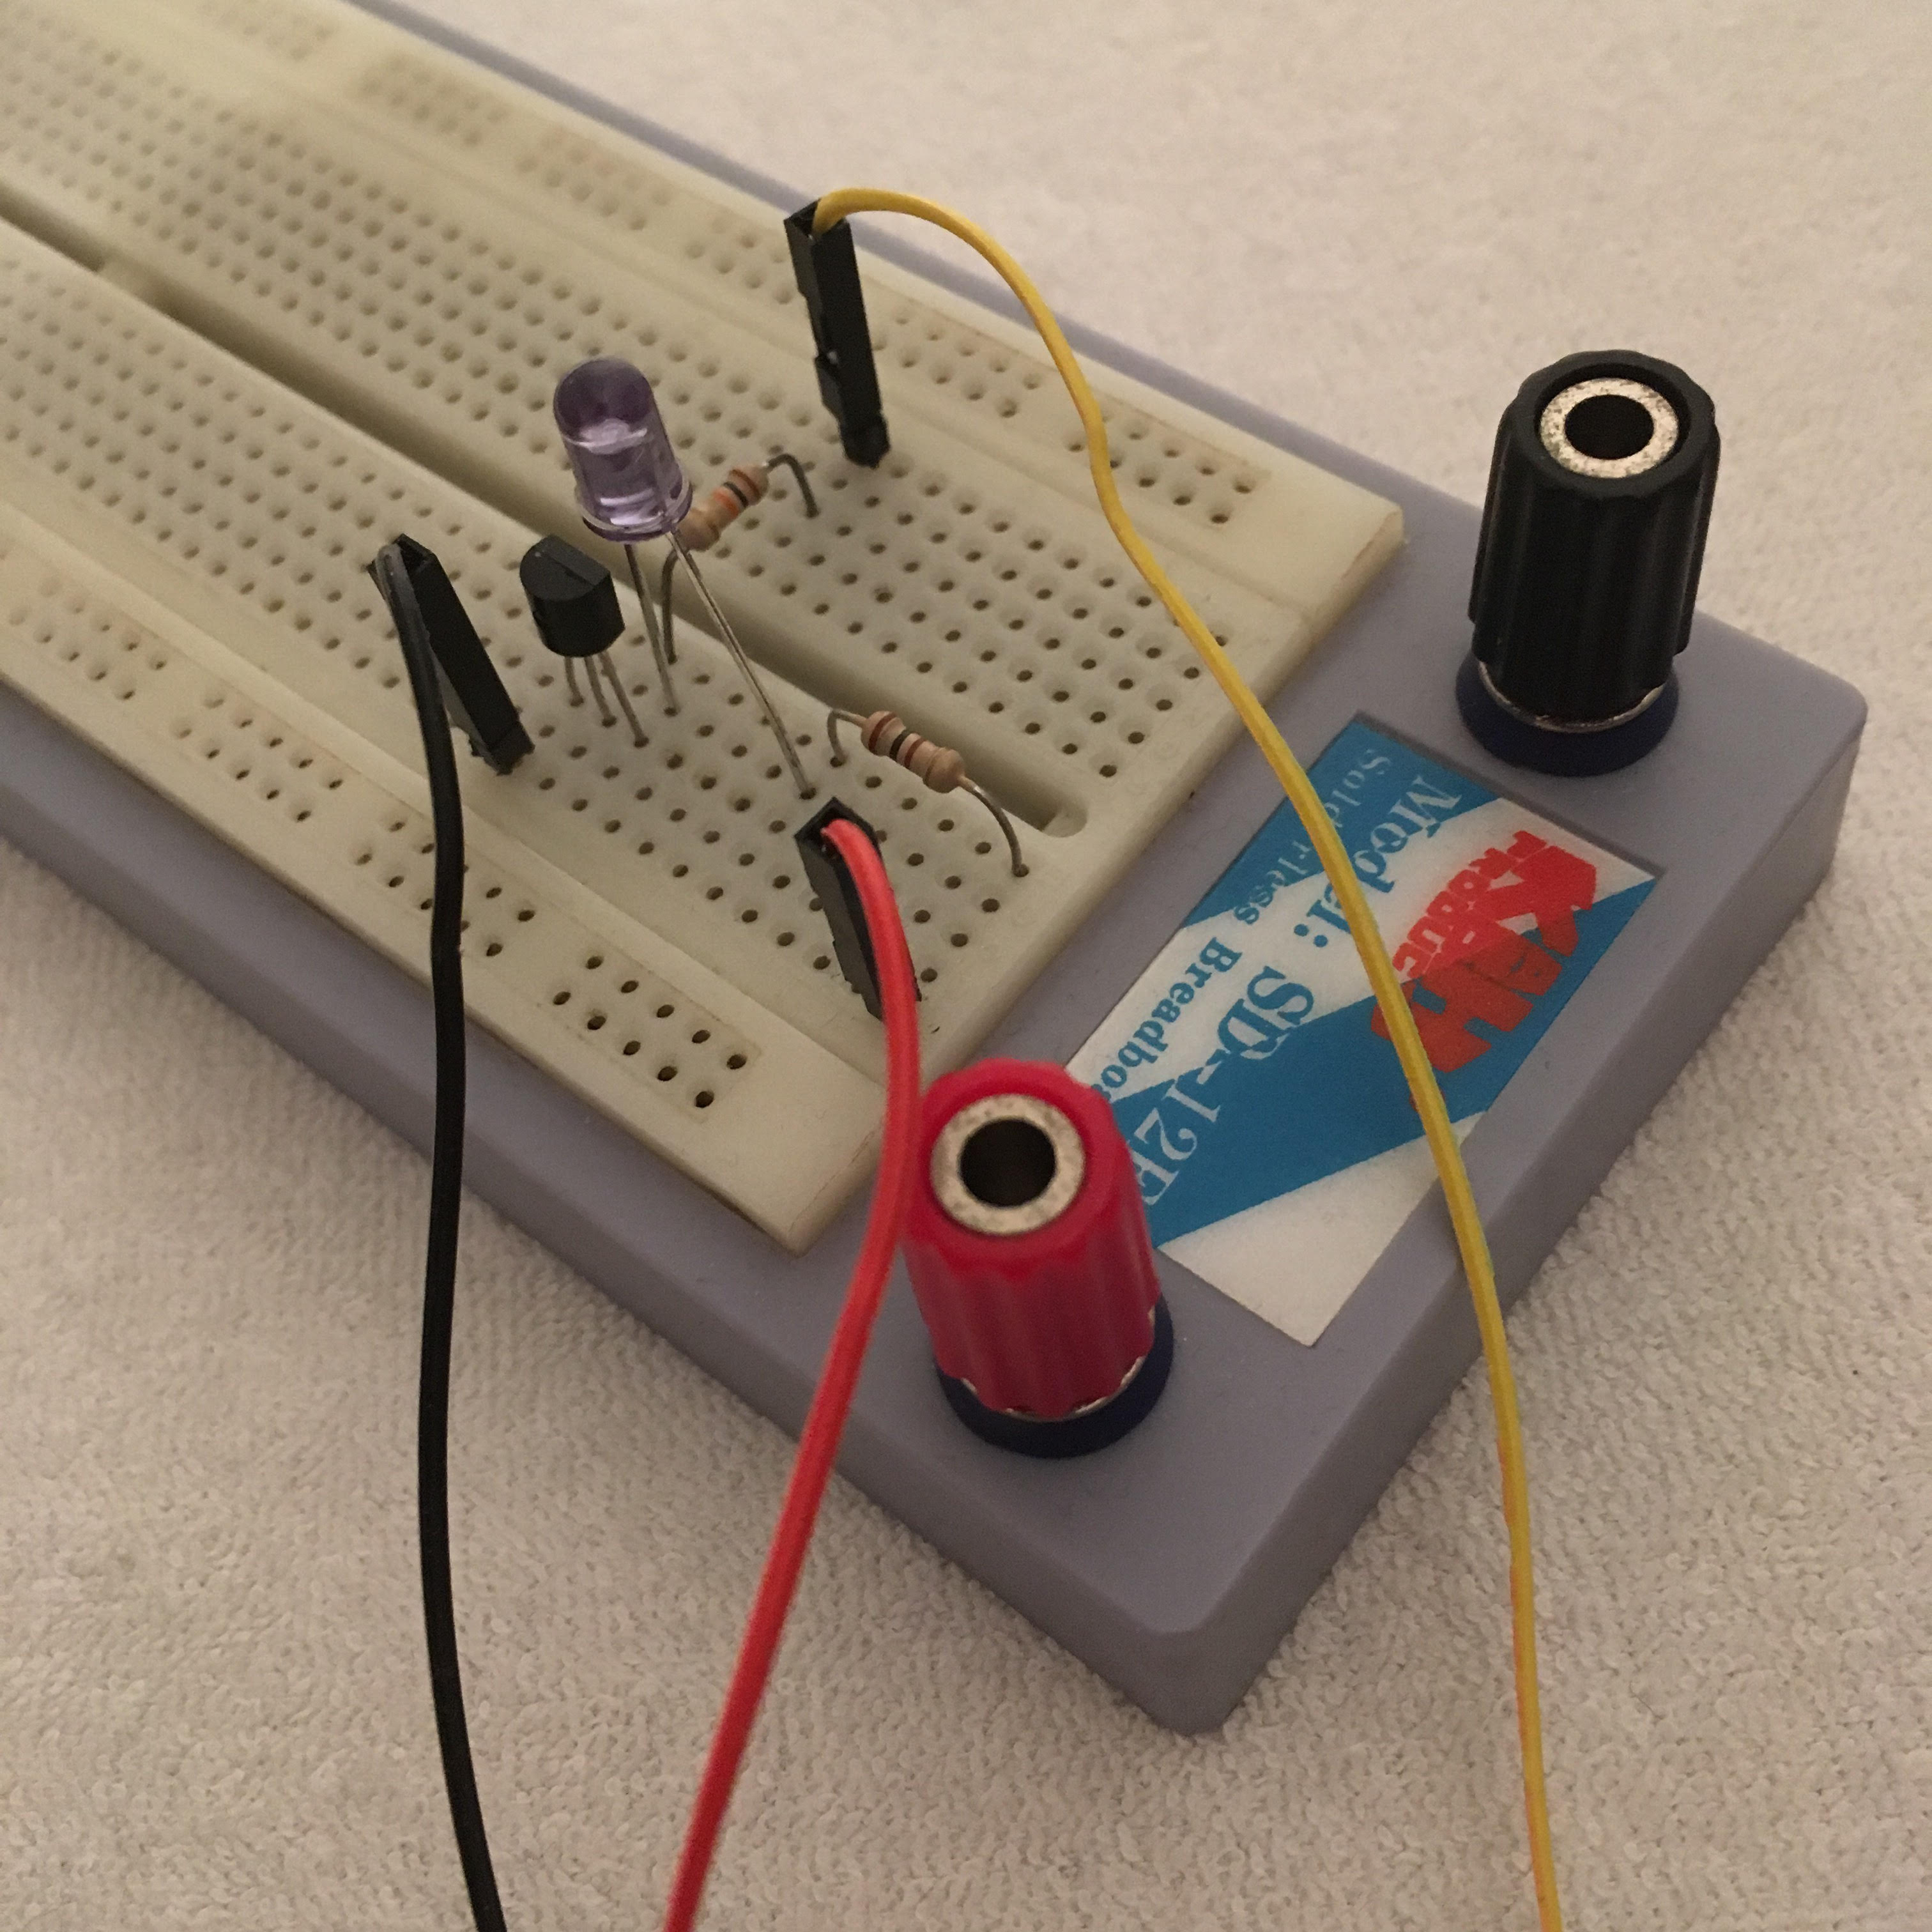
Photo of the wiring on the breadboard:
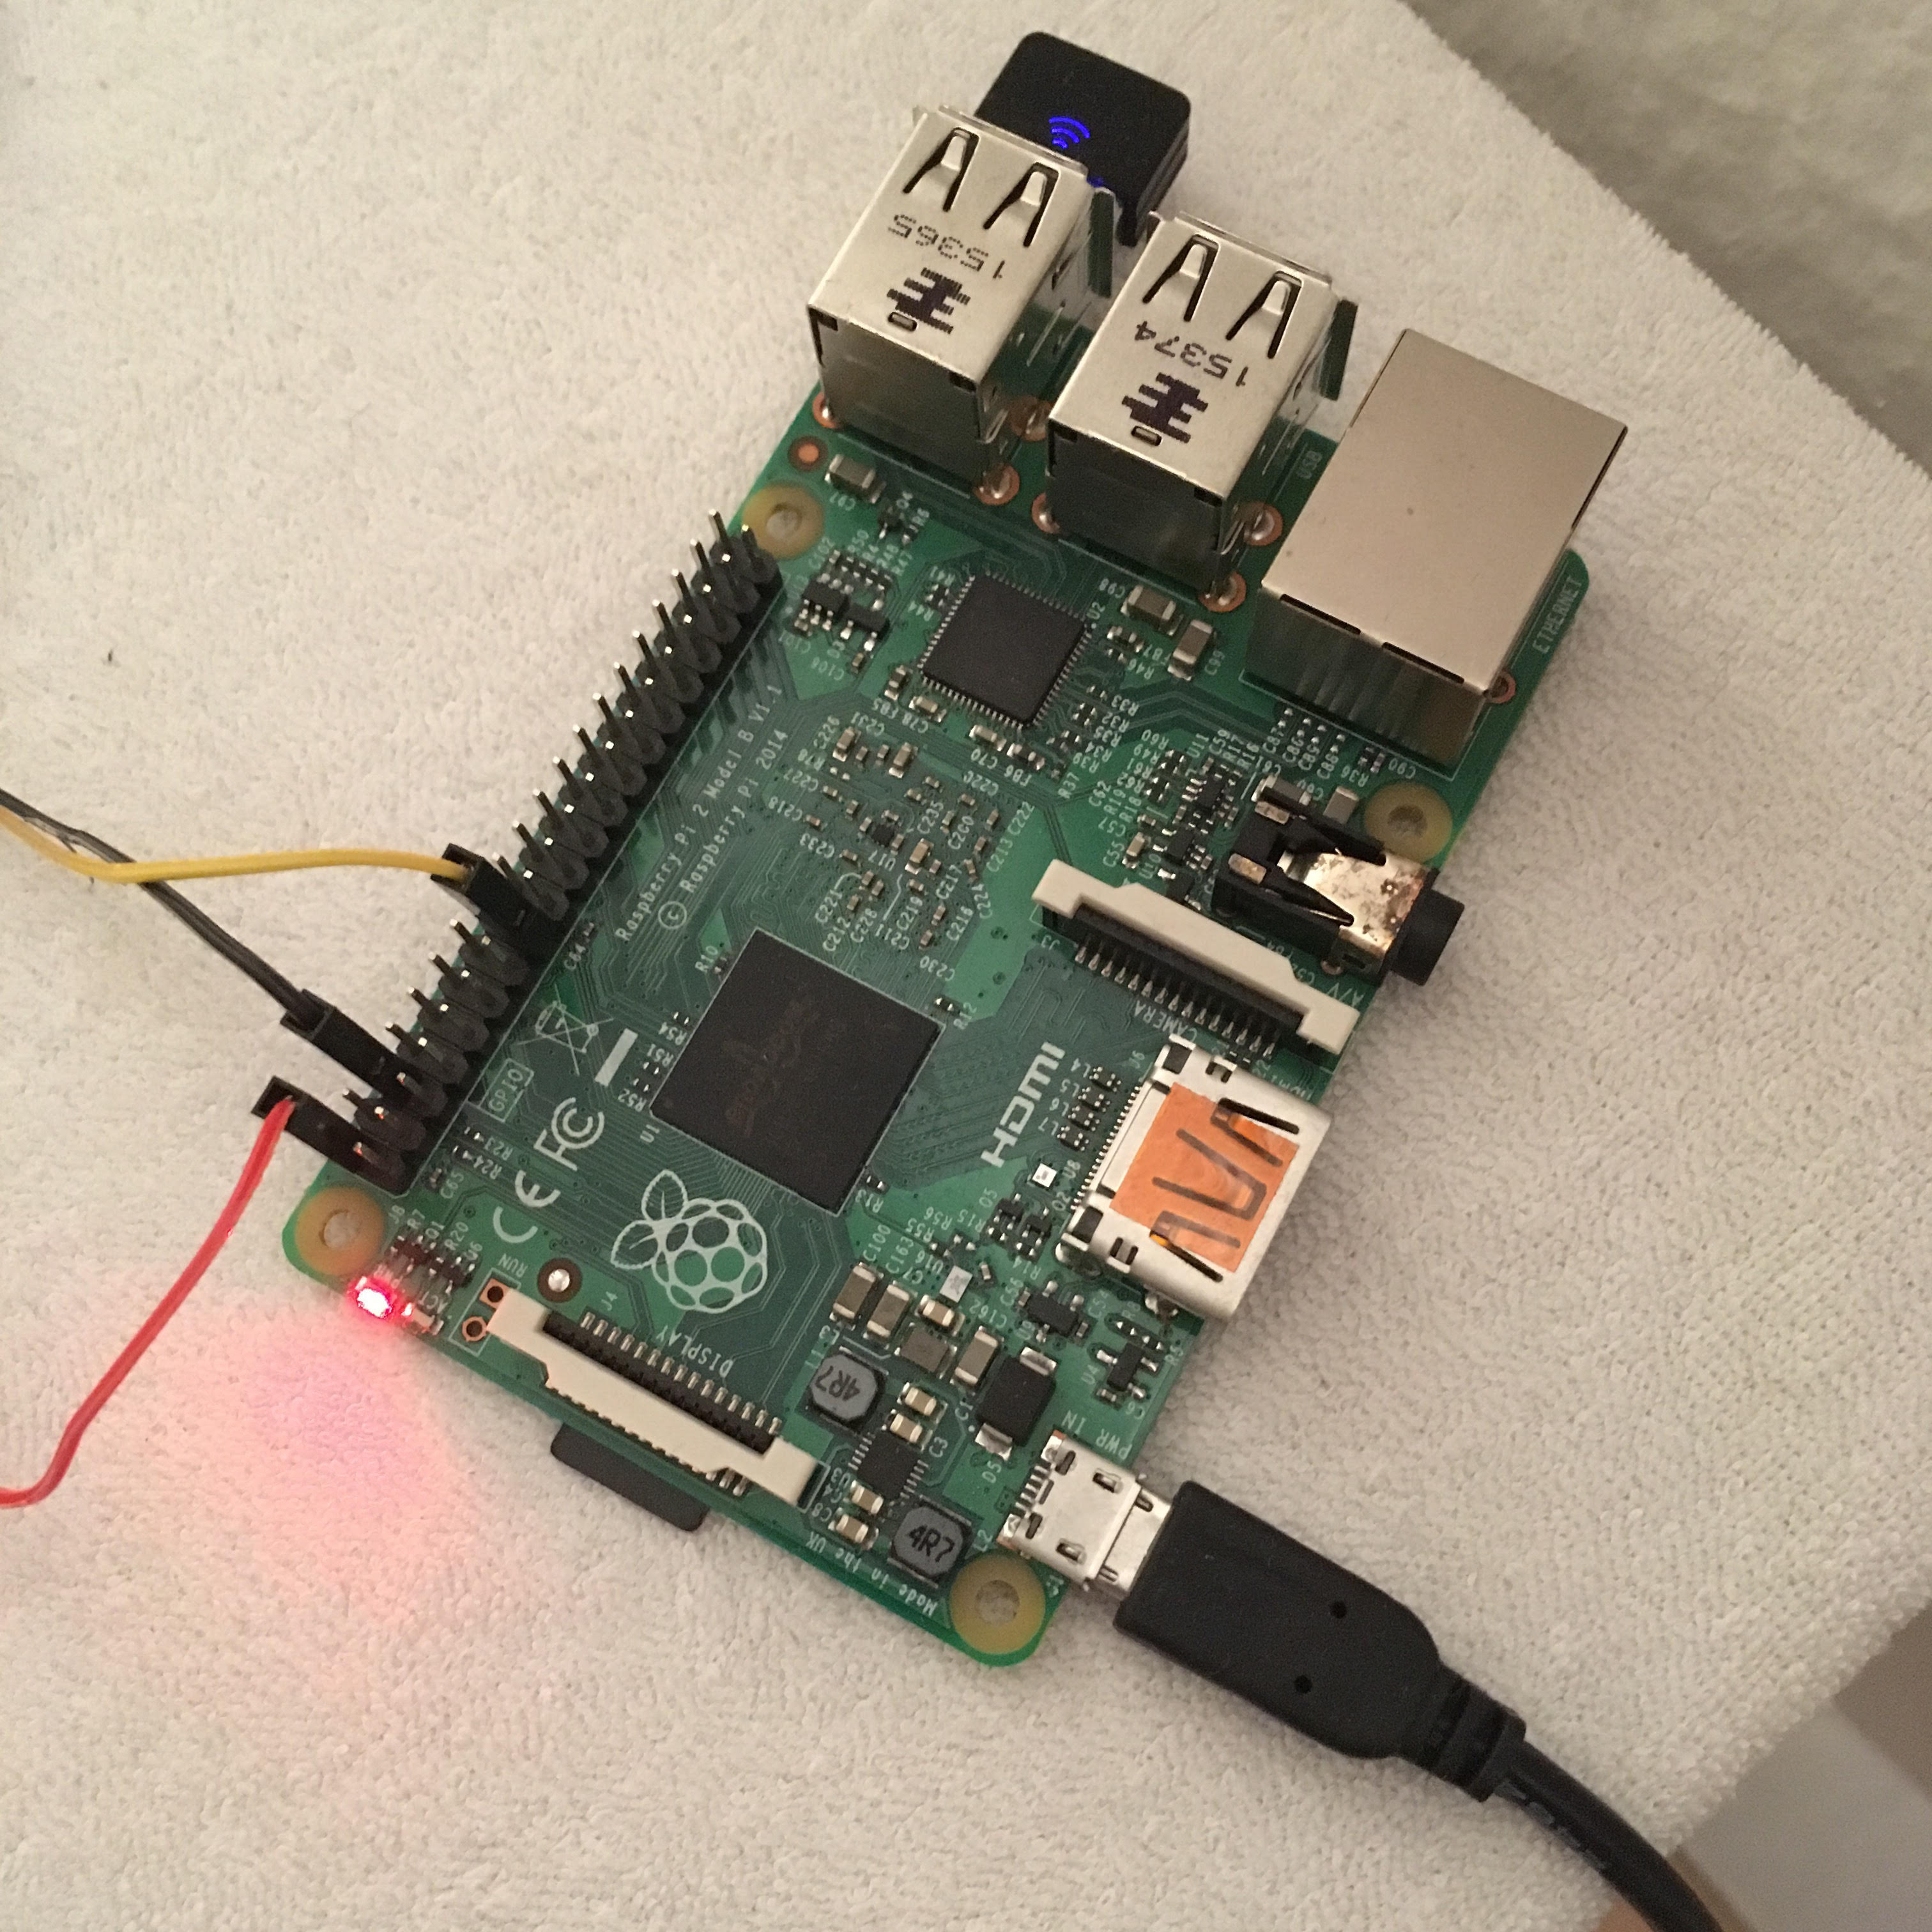
And a photo of the Raspberry Pi wires:
That’s it for the hardware for now. Let’s tweak the software first.
Prerequisites
Terminal
Time to open up a terminal in Raspbian and follow the steps below!
Check Raspbian version
First, make sure that you are using the correct version of Raspbian: for this tutorial I’m using Raspbian Jessie. I don’t guarantee that the same stuff will work on lower or higher versions of Raspbian.
You can check the Raspbian version with this command:
pi@raspberrypi:~ $ cat /etc/os-release
PRETTY_NAME="Raspbian GNU/Linux 8 (jessie)"
NAME="Raspbian GNU/Linux"
VERSION_ID="8"
VERSION="8 (jessie)"
ID=raspbian
ID_LIKE=debian
HOME_URL="http://www.raspbian.org/"
SUPPORT_URL="http://www.raspbian.org/RaspbianForums"
BUG_REPORT_URL="http://www.raspbian.org/RaspbianBugs"
Update package information
Second, make sure that your package information is up-to-date by executing the following command:
pi@raspberrypi:~ $ sudo apt-get update
Check Python 3 version
Raspbian Jessie should have Python 3.4.2 installed by default. You can check the Python 3 version by executing the following command:
pi@raspberrypi:~ $ python3 --version
Python 3.4.2
Install vim
The text editor vim is not installed by default on Raspbian. You can install vim with this command:
pi@raspberrypi:~ $ sudo apt-get install vim
Install virtualenv
We need a Python virtual environment for this tutorial, so we need to install it with this command:
pi@raspberrypi:~ $ sudo apt-get install virtualenv
Okay, now we are good to go!
Install Apache and deploy Flask project
First, we need to install Apache, one of the most popular web servers in the world, together with the mod_wsgi module to be able to deploy the Flask project to Apache through WSGI.
Install Apache and mod_wsgi with the following command:
pi@raspberrypi:~ $ sudo apt-get install apache2 libapache2-mod-wsgi-py3
After the installation, open a browser and surf to http://localhost/ to see a page like this:

This is the Apache default web page and only serves as a confirmation that Apache was installed correctly.
You can check the Apache version with this command:
pi@raspberrypi:~ $ apache2 -v
Server version: Apache/2.4.10 (Raspbian)
Server built:   Sep 20 2017 10:24:25
Now we are going to disable the default settings of Apache and deploy the Flask project to it.
The default page is located in the public HTML directory. Move to this directory:
pi@raspberrypi:~ $ cd /var/www/html
Clone the Flask project (or your own fork) in this directory:
pi@raspberrypi:/var/www/html $ sudo git clone https://github.com/braek/legoirblaster.git
Make sure that the user pi and group pi are both owner of the directory:
pi@raspberrypi:/var/www/html $ sudo chown pi:pi legoirblaster
Now, move in the project directory:
pi@raspberrypi:/var/www/html cd legoirblaster
And create a new Python virtual environment:
pi@raspberrypi:/var/www/html/legoirblaster $ virtualenv -p python3 --no-site-packages venv
Activate the newly created virtual environment:
pi@raspberrypi:/var/www/html/legoirblaster $ source venv/bin/activate
The command prompt should change to something like this:
(venv)pi@raspberrypi:/var/www/html/legoirblaster $
This means that the virtual environment venv is activated.
Now install the Python dependencies from the requirements.txt file:
(venv)pi@raspberrypi:/var/www/html/legoirblaster $ pip install -r requirements.txt
Now that the dependencies are installed, you can run the unit tests to check the stability of the project on your machine:
(venv)pi@raspberrypi:/var/www/html/legoirblaster $ python -m unittest
...................................................................................................................................................
----------------------------------------------------------------------
Ran 147 tests in 0.563s

OK
Finally, deactivate the Python virtual environment:
(venv)pi@raspberrypi:/var/www/html/legoirblaster $ deactivate
You should see the command prompt changing back to normal:
pi@raspberrypi:/var/www/html/legoirblaster $
Move back to the home directory:
pi@raspberrypi:/var/www/html/legoirblaster $ cd ~
Now, create a new site configuration in the Apache directory:
pi@raspberrypi:~ $ sudo vim /etc/apache2/sites-available/legoirblaster.conf
And paste the following content in this file:
<VirtualHost *:80>
    WSGIDaemonProcess legoirblaster python-home=/var/www/html/legoirblaster/venv user=pi group=pi threads=5
    WSGIScriptAlias / /var/www/html/legoirblaster/wsgi.py
    Alias /static /var/www/html/legoirblaster/legoirblaster/static
    <Directory /var/www/html/legoirblaster>
        WSGIProcessGroup legoirblaster
        WSGIApplicationGroup %{GLOBAL}
        Require all granted
    </Directory>
</VirtualHost>
Disable the default Apache site:
pi@raspberrypi:~ $ sudo a2dissite 000-default
And enable the site configuration we just created:
pi@raspberrypi:~ $ sudo a2ensite legoirblaster
And finally, reload the Apache configuration:
pi@raspberrypi:~ $ sudo service apache2 reload
When you refresh the page on http://localhost/ you should now see something like this:

You see a red message saying “LIRC is not installed or FUBAR” which is perfectly normal at this stage, because LIRC is not yet installed and configured.
LIRC
First, install LIRC with this command:
pi@raspberrypi:~ $ sudo apt-get install lirc
Next, open the /etc/modules file:
pi@raspberrypi:~ $ sudo vim /etc/modules
And add the following lines:
lirc_dev
lirc_rpi
Lots of tutorials and blog posts say that you need to configure the output pin here, but that is actually not necessary.
Open the /etc/lirc/hardware.conf file:
pi@raspberrypi:~ $ sudo vim /etc/lirc/hardware.conf
Make sure that it contains the following key-value pairs:
LIRCD_ARGS="--uinput"
DRIVER="default"
DEVICE="/dev/lirc0"
MODULES="lirc_rpi"
Next, open the /boot/config.txt file:
pi@raspberrypi:~ $ sudo vim /boot/config.txt
Uncomment the following line:
#dtoverlay=lirc-rpi
And change it into:
dtoverlay=lirc-rpi:gpio_out_pin=22
Note that the GPIO output pin is configured here instead of in the /etc/modules file.
Now, open the sudo vim /etc/lirc/lircd.conf file:
pi@raspberrypi:~ $ sudo vim /etc/lirc/lircd.conf
To add the LEGO® IR Remote here:
include "/var/www/html/legoirblaster/lirc/LEGO_Single_Output.conf"
We are almost there, but there is still one problem that we haven’t encountered yet. You need to start the LIRC device /dev/lirc0 every time manually when the Raspberri Pi boots.
We can fix this however by opening the /etc/rc.local file:
pi@raspberrypi:~ $ sudo vim /etc/rc.local
And adding this line:
sudo lircd -d /dev/lirc0
Right before this line:
exit 0
Make sure that the line with the exit statement is still the last line of this file.
Now, reboot the Raspberry Pi:
pi@raspberrypi:~ $ sudo reboot
After reboot, open a browser and surf again to http://localhost/ to see this screen:
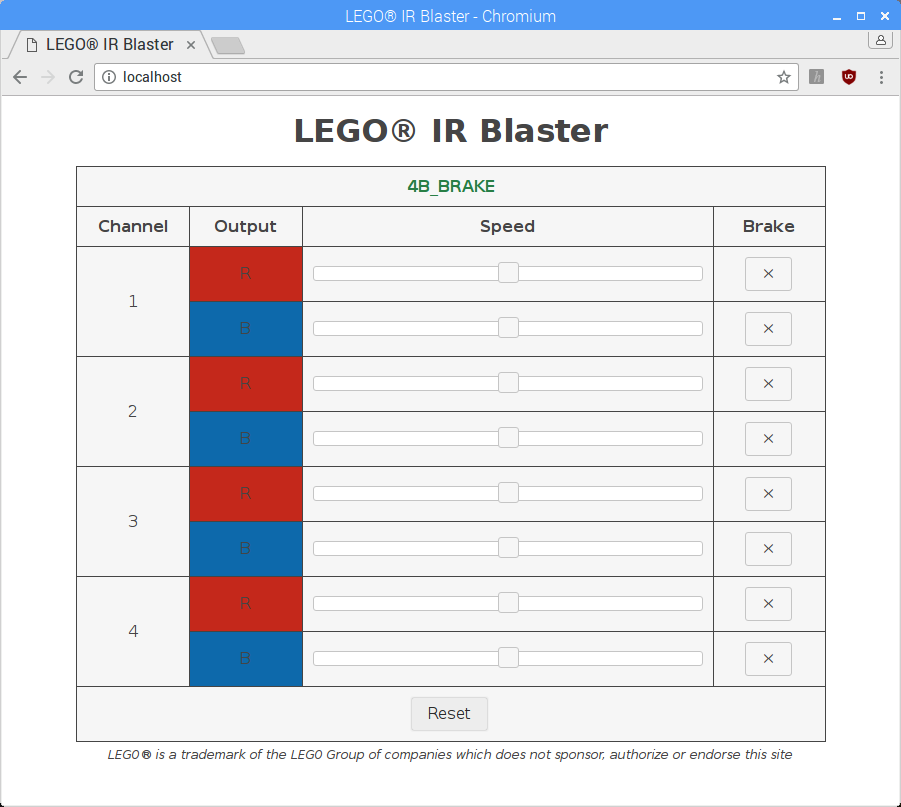
As you can see: there is no longer a red message, because LIRC is now installed and configured.
If your IR blaster (hardware) is properly built and connected on the Raspberry Pi, you should now be able to control LEGO Power Functions through this web interface!
Final words
In the future I will explore some more 3rd party solutions to control LEGO® trains, but this was nonetheless a fun DIY project! :-)